In short
- The layer below must hold its surface: pour it at medium trace, and pour every layer after it slowly over the back of a spatula, close to the surface.
- Each centimetre of a 25 × 9 cm loaf holds about 225 g of batter. Work the layers out from the mould, then pour them by weight.
- A pencil line is a veil, not a crust: about ⅛ teaspoon of mica is plenty for a 25 × 9 cm layer. Too much powder keeps the layers from joining, and the bar splits there.
- Pour the next layer within minutes, while the one below is firm enough to hold but still soft.
- Separate small batches give the crispest lines; one batch split into portions is quicker but softer-edged.
On this page
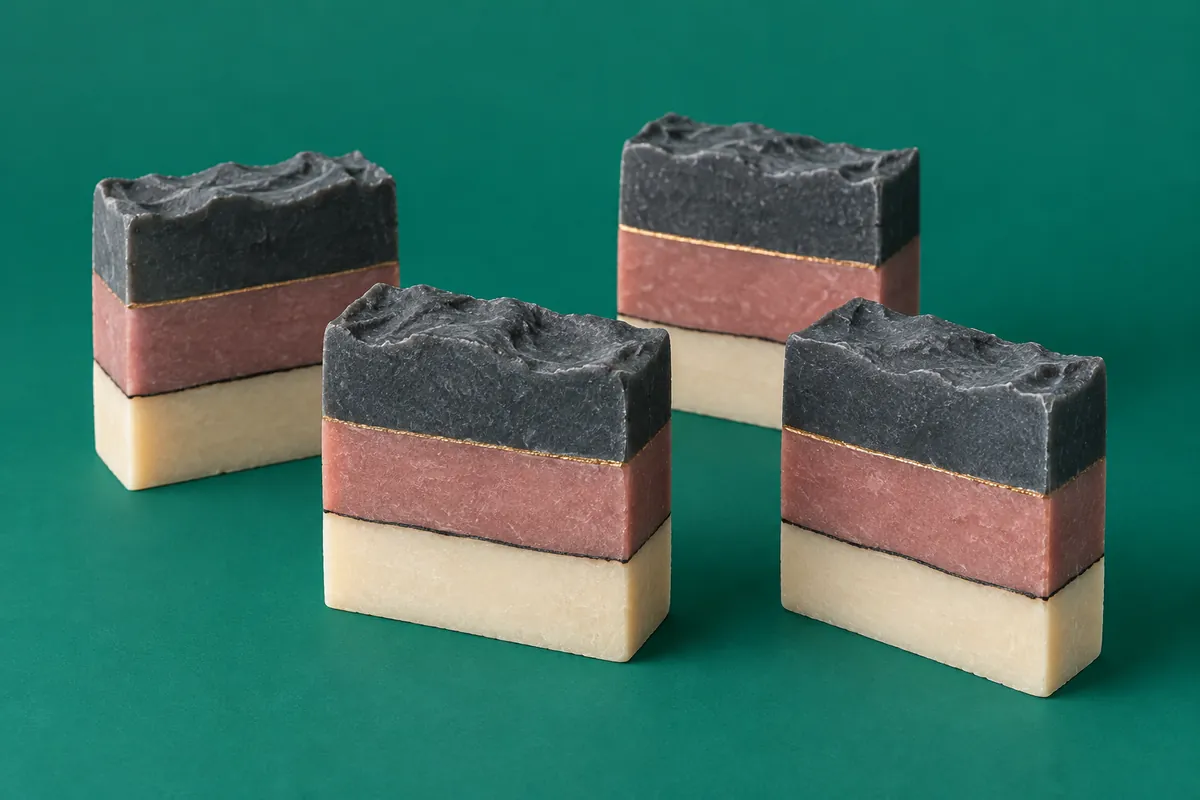
A layered bar is a stack of batters poured one on top of another, like our three-layer clay bar. What makes it clean is simple to say: every layer has to be thick enough to hold the next, and the next has to arrive gently enough not to break through. The rest of this guide is how to judge those two things, how much batter each layer needs, and how to draw a line between them that the bar won’t split along.
What makes a clean layer
Thickness. The layer underneath must hold its surface. Pour it at medium trace, pudding that holds a drizzled line on top for a while, and let it firm for a few minutes before the next goes on. The layer going on top should be at least light trace, and medium is safer. The trace guide shows the stages. Anne-Marie Faiola uses pomace olive oil in some layered recipes because it sets up sooner.
A gentle pour. Hold a spatula, back up, just above the surface of the layer below and pour the new batter onto it, so it spreads sideways instead of punching down. Start at one end and move along. Keep the spout low: the height that helps a drop swirl is exactly what breaks a layer.
A level mould. Set the mould on a level surface before you start and don’t move it until the last layer is in. A mould tilted while the layers are soft gives lines that slope or wave.
Tap after each layer. A few firm taps of the mould on the worktop settle the batter and bring trapped air up, before the next layer seals it in.
One batch or several. You can make the whole batch, pour part, and colour and thicken the rest for the layer above. It is quicker, but the line between the layers comes out softer, a blend rather than a crease. For a crisp line, make each layer as its own small batch and pour them a few minutes apart, as Cable and Letcavage and Harden both advise. If you split one batch, the portions left waiting keep thickening, so pour the first layer from the portion you blended thickest and keep the others thin until their turn. Faiola goes further: she keeps the whole batch at thin trace, and for each layer pours about a cup (240 mL) of the right colour into a spare jug and stick-blends it for 5 seconds, to medium trace, just before it goes in.
Working out each layer from the mould
A mould’s volume in millilitres is close to its capacity in grams of batter, because fresh batter weighs about 1 g per mL (the moulds guide explains why and how to check your own). So each layer is simply its share of the mould:
- A loaf mould 25 × 9 cm inside, filled 6 cm deep, holds 1,350 mL, about 1,350 g of batter.
- Each centimetre of height is 25 × 9 × 1 = 225 mL, about 225 g.
| Layer | Height | Batter | Oils, if made as its own batch |
|---|---|---|---|
| Bottom | 3 cm | 675 g | 466 g |
| Middle | 1 cm | 225 g | 155 g |
| Top | 2 cm | 450 g | 310 g |
For the palm-free classic at a 33 % lye solution with 3 % fragrance, whose oils make up 69 % of its batter. Sized with the calculator’s mould panel.
If you split one batch, make it for the whole mould (931 g of oils in this recipe) and weigh each layer’s share into its own jug, as our ombre layers bar does for its five bands. Faiola stands the mould itself on a tared scale and pours each layer by weight, which also tells you when to stop.
If you make each layer as its own batch, the lye calculator does the sizing. Open Size the batch to a mould, enter the mould, and set Fill to the layer’s share: 50 % for the bottom layer here, a sixth (about 17 %) for the middle, a third (about 33 %) for the top. It gives the oils for that layer in your recipe’s own proportions.
One 2 cm layer, as its own batch. 310 g of oils takes 42.9 g of sodium hydroxide and 87.2 g of water, and makes about 450 g of batter with fragrance.
Open it in the calculatorPencil lines
A pencil line is a thin line of powder between two layers: mica for a shimmer, activated charcoal for a black line, cocoa for brown. It is the easiest way to make layers look deliberate, and the most common reason a layered bar comes apart.
- Level the layer. Smooth the layer below with a spatula for a straight line, or ruffle its surface with a spoon for a wavy one. Let it firm for a few minutes.
- Load a strainer. Put a little powder in a tea strainer, tea ball or small sieve.
- Dust it close. Hold the strainer a few centimetres above the surface and tap it gently as you move from one end to the other.
- Even it out. Step back, close your eyes, and blow gently across the surface to spread the dust into an even veil.
- Pour gently. Pour the next layer over a spatula, starting at one end, so it does not push the powder into drifts.
How much: a veil, not a crust. Faiola dusts ⅛ teaspoon of mica over the whole top of a loaf about this size, 25 × 9 cm, and that is as much as a line needs: about 0.2 g of mica, or 0.3 g of charcoal, as in our charcoal pencil line bar and cedarwood and lavender bar. You should still just see the batter through the powder.
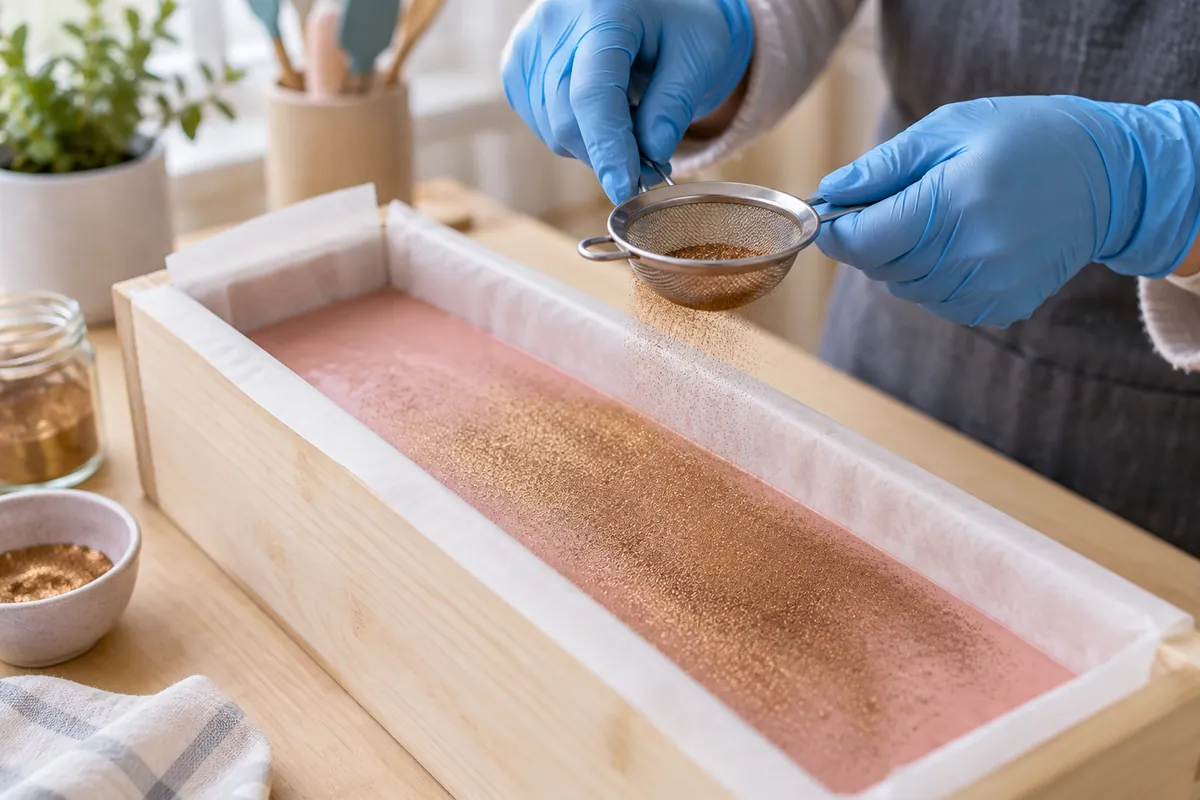 Dusting a pencil line: close to the surface, tapped out evenly, a veil rather than a crust.
Why too much powder splits the bar
Powder is not soap. Where it lies thick, the batter above sits on a layer of loose particles instead of on the soap below, and the two layers cannot grow together. The bar holds while it is in the mould and then cleaves along the line when you cut it, or later in the shower. Soap Queen gives the same warning for charcoal lines: too much, and the layers may not stick together. If you overdo it, blow the loose excess off before you pour, rather than pouring over a drift.
Cutting a lined bar
Cut layered and pencil-lined loaves on their side, as Faiola does, so the knife runs along the lines instead of dragging powder and colour through them. Charcoal still smears when a bar is first cut. Her fix is to let the bars dry for about two days, then scrape a very thin layer off the cut faces with the back of a knife, which leaves the lines crisp.
Keeping the layers together
Cold-process layers bond by being poured while the one below is still soft, so the two set as one. Pour the next layer as soon as the layer below holds its surface, usually within minutes; Faiola’s angled layers needed only 5 to 10 minutes each. A layer left for hours has set enough that the next one may not bond to it. Melt and pour is different: there, a mist of alcohol and a warm pour help a new layer grip a set one, which the melt and pour guide covers.
Treat the finished loaf as one. Cover and insulate it, or keep it cool, as a whole: a loaf that gels in the middle and not at the edges shows a ring through every layer (gel phase).
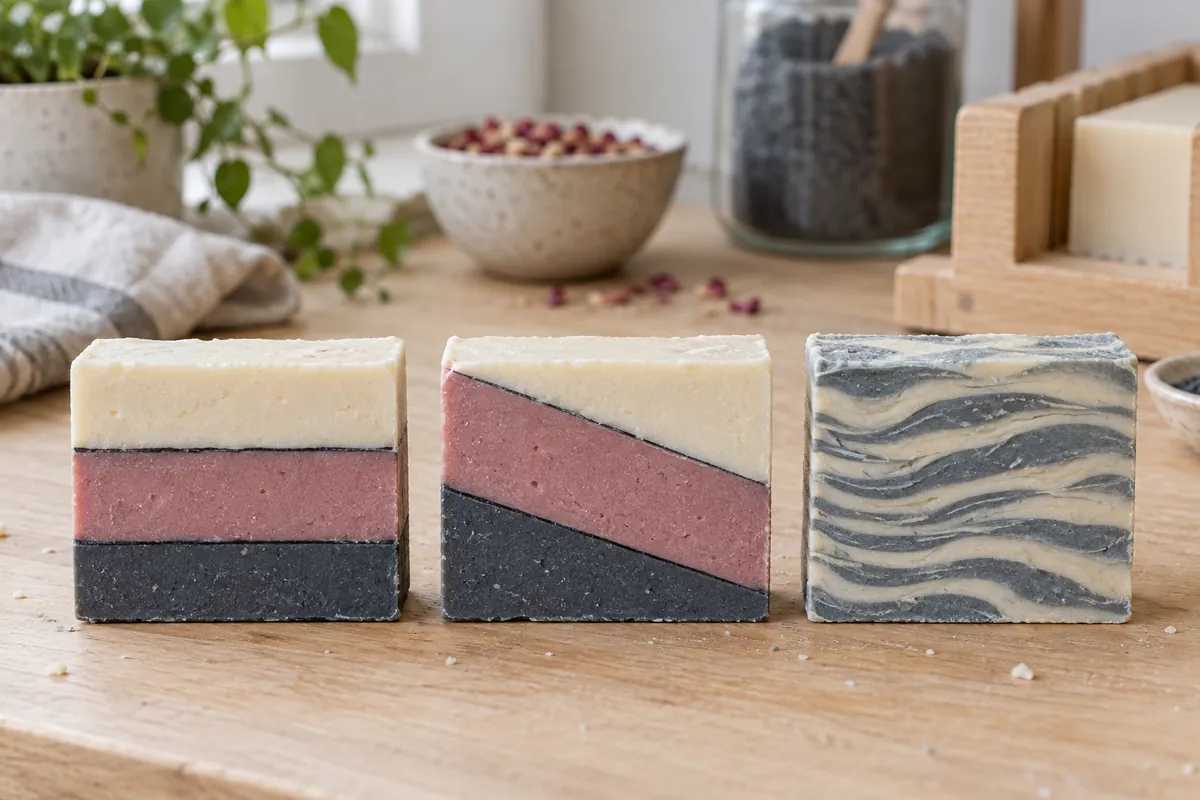 Flat layers with a pencil line, angled layers, and tiger stripes.
Angled layers
Layers that meet on a diagonal. Faiola made the three layers as three separate small batches, one straight after another, so each could firm while the next was mixed.
- Prop the mould. Raise one long side about 2.5 cm (1 in) on a folded towel or a board.
- Pour the first layer against the low side, at medium trace, and leave it propped for 5 to 10 minutes, until it holds the slope.
- Change the angle. Move the prop to the other long side and pour the second layer over a spatula, close to the surface.
- Finish level. Take the prop away, let the mould sit flat, and pour the last layer on top.
The batter for the first two layers must be thick enough to hold a slope; at light trace it will simply run level again.
Tiger stripes
The name covers more than one design; here it means many thin layers poured in turn into the same spot. Pour a little of the first colour into the middle of the mould for a count of two or three, then the next colour on top of it in the same place, and keep alternating until the batter is used. Each pour spreads out and pushes the ones before it outwards, so the cut face shows many thin, wavy bands. Light trace works best, so each colour spreads before the next arrives.
Faiola’s funnel pour is the tidy version: she pours five colours through a funnel into one spot, a count of three each, about ten times round, and gets fine, even bands. Her cylinder pour does the same in a tube, aiming each colour at the centre of the one before.
Her zebra stripes, a technique she credits to Vinvela Ebony, use a sheet of card instead. Cut a manila folder to the width of the mould and 13 cm (5 in) tall, and angle it so its edge just touches the first layer without pushing in. Pour a thin strip of one colour across the card so it runs down onto the layer, then a strip of the other, and repeat, five passes of each, without moving the card. The batter wants to be at very thin trace.
When layers go wrong
| What you see | Why | Next time |
|---|---|---|
| The top layer broke through into the one below | Lower layer too soft, or the pour too hard | Medium trace below; wait a few minutes; pour low over a spatula |
| Lines slope or wave | Mould not level, or moved while soft | Level surface; leave the mould alone until the last layer is in |
| The bar splits along the line | Too much powder, or the lower layer had set | A veil of powder, not a crust; pour the next layer within minutes |
| The line is smeared or swirled | Next layer poured too hard, or too thin | Pour gently over a spatula at light to medium trace |
| Colour or powder dragged down the cut face | Cut across the layers | Cut the loaf on its side; scrape smeared charcoal off after two days |
| Holes between layers | Air trapped under the new layer | Tap the mould after every layer |
| Colour crept across the line | A dye that bleeds | Pigments, oxides and micas for layers |
| Darker centre, paler edges | Partial gel | Gel the whole loaf or none of it |
Causes and fixes from Faiola, Fisher, Cable, Letcavage and Harden, and Soap Queen.
Recipes to try
All recipesSources
- Soap Crafting: Step-by-Step Techniques for Making 31 Unique Cold-Process Soaps . Anne-Marie Faiola, Storey Publishing , 2013. Pouring over a spatula, tamping, pouring by weight on a tared scale, dusting mica through a tea ball, the angled pour and the funnel pour.
- The Complete Photo Guide to Soap Making . David Fisher, Creative Publishing International , 2018. The mica-dust line: flat or wavy, tapped from a tea ball and blown even.
- Natural Soap Making . Elizabeth Letcavage and Melissa Harden, Stackpole Books , 2013. One-batch against two-batch layering; keeping the mould level.
- The Natural Soap Making Book for Beginners . Kelly Cable, Althea Press , 2017. Thick trace for layers; two batches minutes apart for crisp lines.
- Pure Soapmaking . Anne-Marie Faiola, Storey Publishing , 2016. Pomace olive oil for layers that must set sooner; each layer thickened on its own from a thin batch; cutting layered loaves on their side; scraping smeared charcoal after two days; zebra stripes down a manila folder, credited to Vinvela Ebony.
- Rose Clay and Charcoal Soap Tutorial . Soap Queen (Bramble Berry) . Supplier tutorial: a thin, even charcoal line; too much and the layers may not stick together.